

How To Clean A Marlin Lever Action 22
by Roy Seifert
Click here to purchase a CD with this and all Kitchen Table Gunsmith Articles.
Disclaimer: This article is for entertainment just and is not to be used in lieu of a qualified gunsmith. Please defer all firearms work to a qualified gunsmith. Any loads mentioned in this article are my loads for my guns and accept been carefully worked upward using established guidelines and special tools. The writer assumes no responsibility or liability for utilise of these loads, or apply or misuse of this article. Please annotation that I am not a professional person gunsmith, simply a shooting enthusiast and hobbyist, as well as a tinkerer. This article explains work that I performed to my guns without the assistance of a qualified gunsmith. Some procedures described in this article require special tools and cannot/should not be performed without them.
Tools and firearms are the trademark/service mark or registered trademark of their respective manufacturers.
Introduction
Ever since I can remember I take been fascinated with firearms. Unfortunately, since my parents were not outdoors people nor sportsmen, my exposure to shooting was limited to the high school rifle squad. On my 21st birthday I purchased a .357 magnum revolver which began my journey into the world of shooting and firearms.
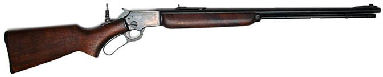
I of the guns I�ve always wanted to have was the Marlin� 39A lever-activity .22 rifle. Believe it or not, this desire began with an arcade game. Every bit a teenager I used to play a shooting gallery arcade game that faux shooting bottles with a lever-action rifle. I ever idea that would be fun to do in real life so I started researching lever-action rifles. At the time I did my initial inquiry, lever-activeness rifles generally came in .30-xxx or .22 calibers. The .30-thirty was primarily used for hunting and would exist likewise expensive for plinking (I wasn�t reloading at the fourth dimension) then I full-bodied on .22�s. The ane that kept coming upwardly was the Marlin� model 39A.
The Marlin� 39A has been in continuous product longer than any other rifle in
Recently on Gunbroker.com I institute a used, Marlin� 39A for $380; nearly twice the toll for a new Brooklyn-made lever-activity .22. Prices for new and used 39A�due south were running $475+ so I felt this was a good deal. However, the fact that this rifle was built in 1947 (equally indicated by the prefix letter D in the series number), it did not have a hammer-block safety, and it came with a tang peep sight made this an outstanding deal in my estimation!
Initial Assessment
This rifle appeared to exist in great shape. At that place were some dings in the butt stock and forearm but these could exist steamed out. The metal and bluing were in splendid condition with just a fleck of surface rust and a few dings and scratches, typical of a 60+ twelvemonth quondam rifle. Information technology was also very dusty indicating that it had been sitting around for some fourth dimension. There�s actually no way of telling how many rounds take been fired through this rifle, but the activeness was glass smoothen, and after a thorough cleaning, the bore looked bright, and the rifling abrupt. This was not the lite, aluminum and plastic lever-action .22 I was used to. Instead, this rifle felt heavy and solid; but like my other big-diameter Marlin� lever rifles.
Magazine Tube
As with any used gun that I purchase, I completely disassembled the burglarize to give information technology a thorough cleaning and inspection. The first trouble I found was with the inner mag tube assembly. It had a slight curve about six inches up from the follower, and the retaining pin that held the knurled plug in the tube was besides loose. This inner mag tube assembly was made out of aluminum, not brass, and there were grinding marks on the tube where the retaining pin holes were drilled which made me call back information technology was a replacement. Research on the Internet indicated that this year gun came with an aluminum inner magazine tube, so the replacement was period right.
I disassembled the inner magazine tube and inserted a wooden dowel so I wouldn�t over-curve the tube. I gently practical pressure on the bend which was piece of cake to see because it was rubbed shiny. I was able to go the tube fairly direct so it slid easily into the outer tube. I�m wondering if this was done on purpose to prevent the tube from falling out, or sliding back in when loading cartridges into the outer tube. I took a cleaning rod with a .45 quotient cleaning patch and thoroughly cleaned the within. Information technology took about 6 patches to clean 60+ years of gunk, then I ran a lubricating patch through the tube.
I reassembled the inner magazine tube and tried to supervene upon the solid retaining pivot with a roll pin but the hole was likewise large. A larger ringlet pin would not fit in the notch in the outer magazine tube, so I installed the retaining pin and staked it in identify with a prick punch. To cease my fix I put a 5/16� O-ring in front of the knurled plug, which provided merely enough tension to foreclose the inner tube from falling out.
Re-Crown the Muzzle
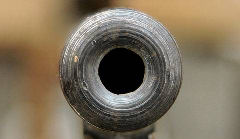
As shown in the above photo, the muzzle crown was crude and pretty dinged up. A poor cage crown will affect accuracy. I decided to re-crown the muzzle, not simply to arrive expect better, but to also allow for maximum accuracy.
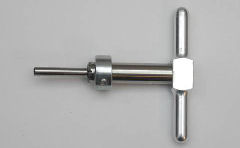
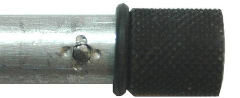
A professional person gunsmith uses a lathe to cut a new crown, but I don�t have a lathe. I used a 79-degree crown cutter I purchased from Brownells to cutting the crown by hand. This cutter makes a recessed target crown, but I used a ane/2-inch diameter cutter � smaller than the bore of the butt � so I wouldn�t cut out to the edge of the barrel. I installed the .22 pilot, handle, and a 1/2-inch stop collar onto the cutter. The terminate collar makes the cut polish, rather than uneven with churr marks. In the photo above the stop collar is set back to show the cutting teeth. I adapted the collar and then it was almost flush with the front of the cutter.
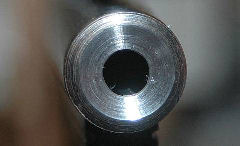
I lubricated the pilot and cutting teeth with cut oil and turned the cutter clockwise. I turned the cutter merely in one management; otherwise I could break the teeth. I cleaned chips off of the cutter and muzzle and lubricated the cutter frequently. I cut until the finish collar touched the front of the barrel. You can meet the nice, clean muzzle in the above photo.
Afterwards I cut the new muzzle crown I used a brass muzzle lap to concluding-lap the muzzle. This ensured the lands and grooves were nice and sharp at the muzzle which results in improved accuracy. I took the smallest contumely muzzle lap and chucked it in my manus drill. I put some 400-grit lapping compound on the stop of the lap, and with the drill running at a medium speed, I pressed the circular end of the lap against the muzzle and used a rotating motion with my wrist to ensure the muzzle was lapped evenly.
Cutting the new crown left a sharp edge on the front of the cage. I took a 400-grit stone and went over that edge merely enough to smooth information technology down. Finally, I blued the exposed crown with cold blue to prevent the metallic from corroding. I degreased the crown with acetone, plugged the bore, then immersed the cage in Van�s Instant Gun Bluish for about v minutes. I wiped off the excess bluing solution, so treated the metal with gun oil to stop the bluing process. The above photo shows the upshot.
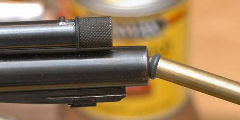
Trigger

I didn�t really measure the trigger pull earlier starting this project, but I did desire it lighter. To reduce trigger pull first I replaced the hammer spring. I removed the original hammer jump past pushing the top of the mainspring plate to the right until it slid out of the frame. I installed a Wolff reduced ability hammer leap that I ordered from Brownells. In the above photo you tin can run into the original hammer leap next to the installed Wolff spring.
To further lighten the trigger pull I pulled up on the trigger return spring until it made light contact on the trigger. After reassembling the burglarize the trigger measured two i/2 pounds, and the rifle was easier to lever. I pulled the bullets and powder from various .22�south I had to test if the lighter hammer jump would still pop a primer. Of the three different types of .22�s I tested, the rifle fired the priming compound with no problems. If yous find in the above photo at that place are 2 notches in the bottom of the receiver for the mainspring plate. If the replacement hammer leap was non strong enough I could accept used the frontwards notch thereby increasing bound tension.
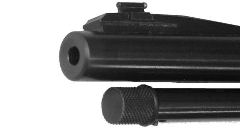
Rear Sight
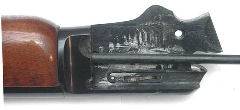
This rifle came with a stock-still, non-folding, rear sight. I removed the rear leaf sight by drifting it out of the dovetail from left to correct. I don�t really need two sights installed, and the leaf sight got in the way of the peep sight.
![]()
I ordered a Marble Arms� replacement folding rear sight from Brownells #579-000-082 and installed it from right to left in the existing dovetail. This sight does not use an elevator to heighten the sight; rather there is a bract insert that slides up or downwards in a channel and is locked in identify with a spiral. The insert has a white diamond and has two unlike notches, round and V; I used the Five. Plus, this sight is besides windage adaptable. Now I have the tang peep sight as my primary sight, and the folding leaf sight as a backup. I keep the leaf sight folded downward when using the peep sight.
Front Sight
The front sight bract came with a brass bead, only as I get older I accept trouble seeing that picayune tiny bead, even later polishing information technology up with a drop of Brasso� on a cleaning patch. I decided to replace the bead front sight with a mail service front sight.
Brownells sells a post forepart sight with a white line in the center for $thirty. I decided to effort to fabricate my own using materials I had on hand. Brownells sells a 12-inch piece of 3/viii� dovetail blank which used as the base of operations for my new sight, and I had some 1/eight-inch steel bar for the post.
I used CorelDraw� to blueprint the front post, then exported the pattern to my CAD/CAM programme. I used my hobby CNC manufacturing plant to cutting a channel in the base for the post, and to cut out the base from the dovetail bare. I also used the CNC mill to cut out the post from the i/8-inch bar stock. I silver-soldered the mail service into the channel I milled in the base, then milled a iii/64 groove in the front ramp of the post. I bead-blasted the new sight, cold-blued it, then practical white apparatus touch-upward paint to the groove. Refer to my article Fabricating a Custom Front end Sight for details.
The dovetail base of operations was just slightly larger than the dovetail in the barrel ramp. I used my 65-degree dovetail file to file 1 side of the sight base until it fit.
Ghost-Band Rear Sight
The fact that this rifle came with an original tang peep sight was 1 of the selling features for me. The tang peep sight had a single, target aperture that folded forward out of the way then the peep could be used as a ghost-band. I find that a ghost-band works well for my aging eyes, and I don�t have to worry about lining up a rear sight, front sight, and target. My eye doesn�t really see the large aperture ghost-ring, but my brain does and automatically lines upward the front sight into the center of the ghost-ring, and then once sighted-in, where always the peak of the front sight is, that is where the shot will go.
However, this sight was not windage adjustable. When I attempted to diameter-sight the rifle with a laser I discovered I had to drift the front sight almost i/viii-inch to the left, which meant I also had to drift the leaf sight that much to the left as well. This did non entreatment to me and I felt it destroyed the aesthetics of the rifle, so I decided to replace the tang peep sight with a windage-adjustable ghost-ring.
I constitute three different types of peep sights for the 39A that were adjustable for both windage and elevation that I could utilise as a ghost-band; 2 were receiver mounted and one was tang mounted. Those three sights were:
- XS� Sight Systems model ML00075� This is a receiver-mounted ghost-ring that comes with a square mail service forepart sight. Although this sight is adjustable for both windage and elevation it is more of a modern hunting sight and didn�t really appeal to me.
- Williams� Gun Sight Visitor Inc. models FP and 5D � These are also receiver mounted sights adjustable for both windage and acme. The 5D is the less-expensive model and does non take the locking micrometer adjustments of the FP. To be used equally a ghost-ring sight I would simply unscrew the discontinuity and use the threaded hole.
- Marble Artillery� model 009827 � This is their tang peep sight #eight and information technology is designed to fit the peep sight holes in the tang of the older 39A models. This was the near expensive of the three sights, merely was also more flow-correct, and adjustable for both windage and meridian. I have this sight on a number of other lever rifles I own and prefer it over other styles. To make information technology a ghost-ring I unscrew the aperture and use the threaded hole.
I decided to supercede the original 1947 peep sight with the Marble Artillery� #8 sight. The sight base and screws fit the predrilled and tapped holes perfectly. I was able to accommodate both windage and elevation and then I didn�t accept to play with the front sight.
Refinishing the Stock
This rifle came with a dark walnut butt stock and forearm with an oil end. Nonetheless, over the years the wood had acquired some nicks and felt dry out and rough to my hands. I decided to refinish the wood to make it smoother and more attractive. This is not a collectable, it is a shooter, but I wanted information technology to wait skillful and function well.
I removed the forearm past first driving out the magazine tube ring pin. I then removed the two forearm tip screws and pulled the magazine tube out of the rifle. The forearm fell out in my hands. I removed the barrel stock by removing the tang screw and pulling the butt stock off of the receiver.
1 of the goals of refinishing a gun stock is to remove as little wood as possible. Over the years I have ruined gun stocks by over-sanding trying to remove old finish. The secret is to apply a good quality stripper and so I don�t have to excessively sand the wood.
I stripped the onetime finish off the forest by applying BIX� stripper that I purchased at my local home improvement store. I applied the stripper with a brush by dabbing it on very thick and letting it ready for xv minutes, and so I scraped off the backlog stripper with a business organisation card. I applied a second coat of stripper and again permit it gear up for 15 minutes. I over again scraped off the excess stripper with a business menu, so scrubbed the wood with water and #2 steel wool every bit described in the instructions.
Afterward stripping the forest I steamed out any dents by applying a wet washcloth to the blank wood and ironing the wet textile. This also raised the grain in grooming for sanding.
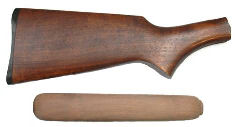
Once the forest was dry I sanded it with 400-grit sand paper. I simply wanted to remove the feathers raised from the steaming process, non change the shape of the wood. I wrapped a strip of 400-grit paper around a curl of soft leather. The leather roll helps to maintain the shape of the woods without leaving whatever dents or apartment spots. The above photograph shows the difference between the original barrel stock and the stripped and sanded forearm.
I removed the sanding dust with a tack rag (an one-time T-shirt worked well) and applied a coat of Minwax� Gunstock #231 stain. This stain goes on brick crimson in colour, but when the excess is wiped off, it leaves a dark-brown-red color.
![]()
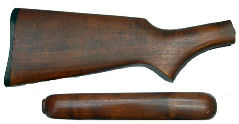
Over the years I�ve tried different finishes on gunstocks. Each has advantages and disadvantages; some are easier to apply, whereas others are easier to repair. My favorite is Birchwood Casey Tru-Oil�. It is easy to utilize, gives a beautiful soft sheen luster to the wood, information technology�due south durable, and it�s easy to repair. After the stain stale I applied three coats of Tru-Oil�. I allowed each glaze to dry for 12 hours, then went over the wood with 000 steel wool. The above photos show the refinished fore end side by side to the original butt stock, but actually don�t do justice to the result.
Before reinstalling the outer magazine tube I ran a cleaning patch through it to make sure information technology was cleaned and lubricated. Very few people always make clean the magazine tube, which tin accumulate dirt. In fact I once had a lever-activeness rifle cease feeding and jam on me because the follower got jammed in a dirty magazine tube. Wouldn�t yous know it happened in the middle of a shooting competition!
When I tried to reinstall the outer magazine tube I before long discovered just how hard this was to reach. Because I had to install the forearm first which covered the magazine tube hole in the receiver, I couldn�t get the tube aligned in the hole. My solution was to install the outer magazine tube until it touched the forepart of the receiver, then I took a pistol/revolver cleaning rod and inserted it into the cartridge feed hole in the receiver. I used the cleaning rod to marshal the tube; it literally took 5 seconds to jerk (gunsmithing technical term J) the rod while pressing on the magazine tube until information technology clicked in identify.
Butt Plate
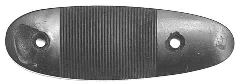
The butt plate had a number of fries around the holes probably because this was not an original butt plate and the countersinks didn�t fit the screws. In that location was a big bit missing from the acme of the butt plate as you can meet in the above photo. Since this butt plate fit the stock I really didn�t want to purchase a new ane and go through all the fitting, so I decided to endeavor to repair it with epoxy.
Kickoff I took a countersink scrap and trimmed effectually the holes. This allowed the screws to fit better. Then I sprayed some release agent I purchased from Brownells around the top spiral and mounted the pad to a slice of 2x4. The release agent prevented the epoxy from sticking to the screw. I read somewhere that Pam� cooking spray makes a good epoxy release amanuensis, but I�ve never tried this. I did not tighten the screw considering I wanted to exist able to rotate the butt plate.
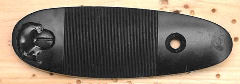
I drilled two small holes in the hollow I planned to fill with epoxy. This gave the epoxy some boosted concur. I mixed some J-B Weld� and added some black dye from a Brownells Acraglas� bedding kit, then applied the epoxy to the chipped expanse using a toothpick. I made sure the holes I drilled were filled with the epoxy, and that the epoxy was higher than the surface of the butt plate. In the above photograph notice the cleaned up countersink effectually the bottom pigsty. While the epoxy was curing I rotated the butt plate to prevent the peak screw from getting glued in place.
Later the epoxy cured I used 180-grit sand paper wrapped around a file and sanded it downwardly flush with the surface of the butt plate. Then I polished the surface with 400, 600, and so 1000-dust moisture/dry sand papers also wrapped effectually a file. The file kept the sand paper flat and gave me more control when sanding. Finally I used jeweler�s rouge on a felt wheel with my loftier speed rotary tool running at the slowest speed to final polish the butt plate. I took the counter sink bit and cut away the excess epoxy from the screw hole. As shown in the above photograph, yous can come across the epoxy patch, but the shape is at present nice and smooth. I was actually very surprised how well this repair turned out. I had idea almost applying a glaze of paint, but I decided not to because I felt the pigment might scrap off over time, and I wanted to prove-off my repair.
Result

The photo above shows the result of my work. The woods actually came out a little lighter in color from the original, but you tin can encounter the semi-gloss stop from the Tru-Oil�.

The real question is, however, how does it shoot? Well, this is one sweet rifle to shoot, and I tin can meet why it is and then popular and still in product. The action is smooth, the trigger is light and well-baked, and it pretty much shoots into one hole. The above target is 15 shots at 25 yards. Overall I�1000 not merely pleased with my work, just I�m very pleased with the rifle. I�ll be shooting this ane for many years.

Source: https://www.ktgunsmith.com/marlin39a.htm
Posted by: downscomplis.blogspot.com
0 Response to "How To Clean A Marlin Lever Action 22"
Post a Comment